
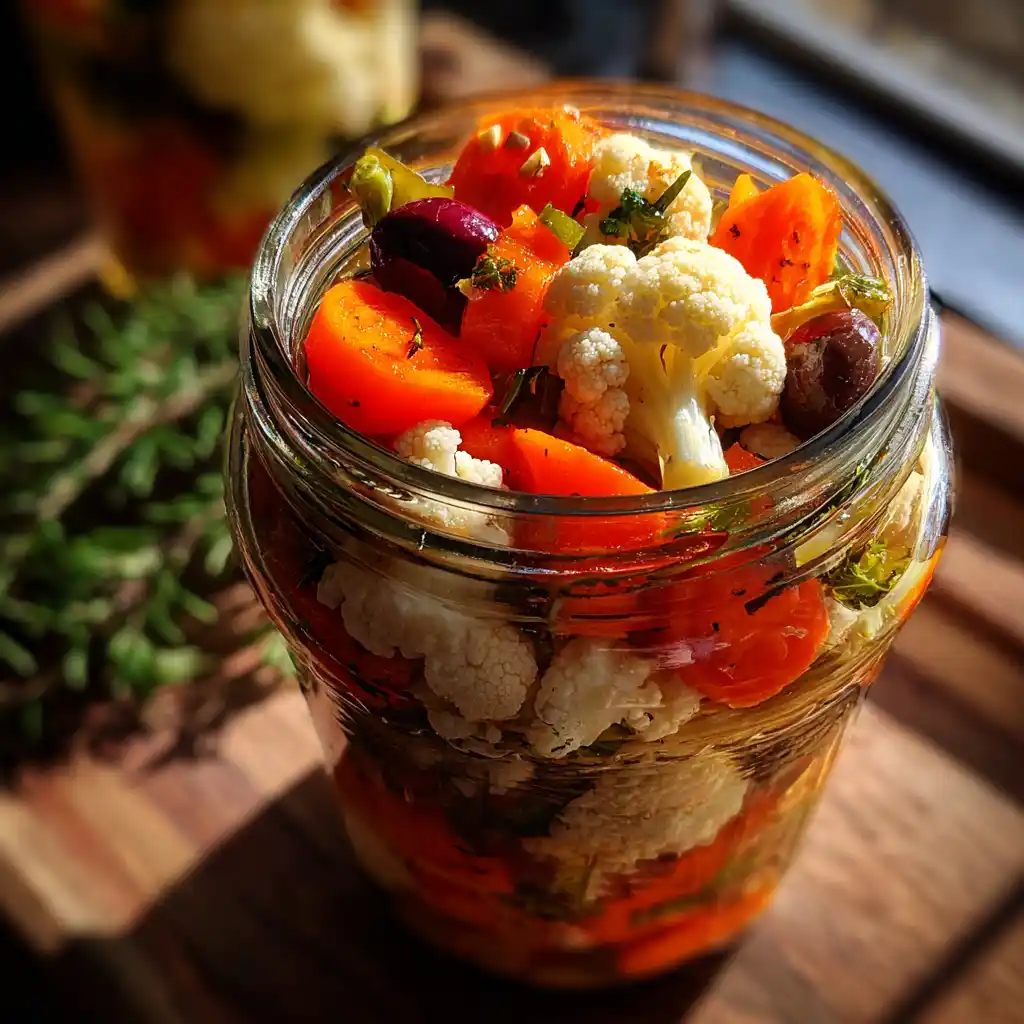
A great giardiniera recipe brings bold, tangy, and spicy flavors to life — all packed into a colorful jar of pickled vegetables. From Italian antipasto platters to Chicago-style beef sandwiches, this zesty mix is more than just a topping. It’s a kitchen essential.
My love for cooking began in a tiny sunlit kitchen on the coast, surrounded by the aroma of herbs and the hum of family chatter. I grew up among women who believed that food was a way to share love. My earliest memory? Helping my aunt with her olive bread — just a sprinkle of herbs made me feel like I was part of something magical.
That memory sparked a lifelong passion for ingredients, flavors, and stories. Every dish I create carries a piece of that warmth — and today, I’m sharing one of my all-time favorites.
This homemade giardiniera recipe is crunchy, customizable, and packed with flavor. Whether you love it spicy, mild, oil-packed, or vinegar-bright, there’s a version here for you.
Learn more about giardiniera variations and preparation tips in this complete giardiniera guide.
Table of Contents
What Is Giardiniera and Why It’s a Must-Try Recipe
Giardiniera Recipe: A Flavorful Introduction to This Pickled Veggie Mix
A true staple of both Italian and American kitchens, the giardiniera recipe is a delightful way to turn basic vegetables into something extraordinary. With the perfect balance of crunch, spice, and tang, it transforms any meal into a flavorful experience.
Giardiniera — meaning “from the garden” in Italian — typically features a pickled blend of cauliflower, carrots, celery, bell peppers, and sometimes jalapeños. What elevates this mix is its bold marinade of vinegar, oil, and spices. Whether you’re new to pickling or looking to try something with a kick, a well-made giardiniera recipe brings texture and brightness to your dishes.
Brief History: From Italian Roots to Chicago Streets
The origins of giardiniera go back to traditional Italian preserving methods, where end-of-season vegetables were jarred in vinegar to last through winter. Italians served it as part of antipasto — the classic platter of meats, cheeses, and marinated bites.
But it was in Chicago where the giardiniera recipe got its spicy reboot. Italian immigrants adapted the original version into something heartier, hotter, and often oil-based. They added sport peppers, green olives, and red pepper flakes, giving birth to what we now know as Chicago-style giardiniera — a must-have topping for Italian beef sandwiches, hot dogs, and pizza.
Today, this pickled blend is no longer a regional secret. From gourmet restaurants to home kitchens, the giardiniera recipe has gained fans across the country. It’s incredibly versatile, easy to make, and endlessly customizable.
Whether you enjoy it mild or spicy, oil-packed or vinegar-bright, this beloved giardiniera recipe is a small batch of bold flavor that belongs in your fridge.
Print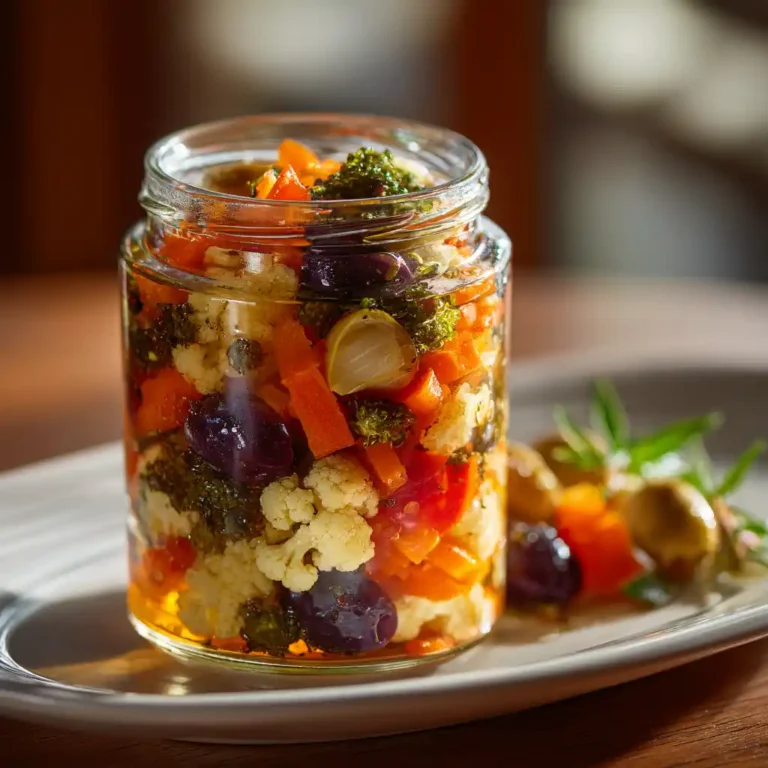
The Best Giardiniera Recipe for Crunchy, Spicy, and Flavor-Packed Perfection
A bold, tangy, and spicy giardiniera recipe — the perfect pickled vegetable mix for sandwiches, antipasto, and more.
- Total Time: 35 minutes (plus overnight soak)
- Yield: 3 to 4 jars
Ingredients
- 1 small head of cauliflower, cut into florets
- 2 carrots, sliced thin or julienned
- 2 celery stalks, sliced
- 1 red bell pepper, diced
- 1 green bell pepper, diced
- 3 cloves garlic, peeled and minced
- 1/4 cup kosher salt
- 2 cups white vinegar
- 1 cup water
- 1 tbsp dried oregano
- 1 tsp chili flakes
- Optional: green olives, sport peppers, mustard seeds, celery seeds
- Optional: 1 cup olive oil (for Chicago-style)
Instructions
- Wash and chop all vegetables to similar sizes.
- Place vegetables in a bowl, sprinkle with kosher salt, cover with water, stir, and refrigerate overnight.
- Drain and rinse vegetables thoroughly, pat dry.
- For classic brine: combine vinegar, water, garlic, oregano, chili flakes in saucepan. Bring to boil, then cool.
- For Chicago-style: mix vinegar and olive oil with spices without boiling.
- Pack vegetables into sterilized jars and pour in the brine/oil mix until fully submerged.
- Seal tightly and refrigerate for 48 hours before consuming.
- Shake jars occasionally to redistribute flavors.
Notes
Customize heat levels with jalapeños or sport peppers. For a milder version, skip hot peppers. Always refrigerate and use clean jars for safe storage.
- Prep Time: 30 minutes
- Cook Time: 5 minutes
- Category: Condiment
- Method: Pickling
- Cuisine: Italian-American
- Diet: Vegan
Giardiniera Ingredients List and Shopping Tips
Classic Italian Giardiniera Ingredients
When creating an authentic giardiniera recipe, it all starts with the vegetables. The traditional Italian version leans on garden staples — the kind of crisp, colorful veggies you’d find in a summer harvest basket.
Here’s what you’ll need for a basic Italian-style mix:
| Ingredient | Purpose | Notes |
|---|---|---|
| Cauliflower | Crunch & body | Cut into small bite-size florets |
| Carrots | Sweetness & color | Slice thin or julienne |
| Celery | Earthy, mild crunch | Adds balance to bolder flavors |
| Bell Peppers | Mild spice & vibrant color | Red, green, or yellow |
| Garlic | Aroma & savory bite | Use fresh, peeled cloves |
| White Vinegar | Preservative & tangy base | Distilled or wine vinegar works |
| Salt | For drawing out moisture | Kosher or pickling salt preferred |
| Oregano & Bay Leaf | Herbal background flavor | Optional but traditional |
Optional Add-Ins:
- Pearl onions
- Gherkins
- Mustard seeds
- Crushed red pepper flakes
These ingredients are soaked in a vinegar brine and often stored in olive oil or left dry, depending on preference.
Chicago-Style Giardiniera Ingredients: What Sets It Apart
Chicago’s take on the giardiniera recipe is all about heat and oil. It features a much spicier profile, with chopped hot peppers and brine replaced by a full-on olive oil marinade.
Here’s what makes Chicago-style unique:
| Additional Ingredients | Role |
|---|---|
| Serrano or sport peppers | Bring the heat |
| Green olives | Add briny richness |
| Celery seeds or mustard seeds | Texture and spice layering |
| Olive oil (or soybean oil) | Rich, fatty mouthfeel |
| Crushed red pepper | Bold spiciness |
The veggies are finely chopped for easier sandwich layering, and the oil helps preserve and coat every piece in flavor. If you’ve ever ordered an Italian beef in Chicago, you know the joy of that oily, spicy giardiniera dripping down the sides.
Discover great ideas like this gluten-free dinner pairing that pairs perfectly with spicy giardiniera.
Where to Shop for Authentic Ingredients (Fresh vs. Jarred)
Whenever possible, go for fresh produce — especially if you’re making a large batch. Farmer’s markets are ideal, but grocery stores with organic sections work well too.
For peppers and olives, you may need to visit an Italian deli or international foods section. If you’re short on time, many ingredients like hot peppers, green olives, and even pre-cut cauliflower are available in jars — just be sure to read the labels and skip any with added sugar or preservatives.
When buying vinegar or olive oil, choose high-quality brands. Your giardiniera recipe depends heavily on how good your oil and acid base taste.
Substitutes for Hard-to-Find Ingredients
Can’t find sport peppers? Use serrano or jalapeños. No green olives? Try capers or omit entirely. The beauty of a good giardiniera recipe is how forgiving it can be.
Here are some common swaps:
| Ingredient | Substitute |
|---|---|
| Sport peppers | Jalapeños, serrano, or banana peppers |
| Cauliflower | Broccoli stems (blanched) |
| Celery | Fennel or green beans (crisped) |
| Bell peppers | Poblano or Anaheim (mild heat) |
| White vinegar | Apple cider or white wine vinegar |
Don’t stress if you have to improvise — the key is keeping that balance of crunch, heat, and tang alive.
Step-by-Step Homemade Giardiniera Recipe
Equipment You’ll Need for This Pickling Project
Before you dive into the actual recipe, gather a few kitchen tools to make the process smoother. Making a giardiniera recipe at home doesn’t require fancy equipment, but having the right tools on hand can make a big difference in safety and efficiency.
Recommended Tools:
- Large mixing bowls (non-metal)
- Sharp knife or mandoline slicer
- Cutting board
- Fine-mesh strainer or colander
- Mason jars or airtight glass containers (sterilized)
- Saucepan (for boiling brine)
- Clean towels or paper towels
Tip: Avoid aluminum or copper bowls when working with vinegar, as they can react with the acid.
Preparing and Chopping the Vegetables Properly
Consistency is key for both flavor and storage. Try to cut all vegetables to similar sizes so they pickle evenly.
Steps:
- Wash all vegetables thoroughly.
- Cut cauliflower into small florets.
- Slice carrots and celery into thin sticks or coins.
- Julienne or dice bell peppers.
- Chop hot peppers (use gloves to avoid burns).
- If adding olives, drain and slice them now.
Uniform pieces will not only look great in the jar but also ensure a consistent texture in every bite.
The Salting Process: Drawing Out Moisture
This step is crucial to create that crunchy texture in your giardiniera recipe.
Here’s how to do it:
- Combine all chopped vegetables in a large bowl.
- Sprinkle generously with kosher salt (about ¼ cup).
- Add enough water to cover the mix and stir well.
- Cover and refrigerate overnight (or at least 8–12 hours).
The salt pulls moisture from the veggies and firms them up. The result? Crunchy, crave-worthy pickles.
After soaking, drain and rinse thoroughly to remove excess salt. Pat dry with clean towels to prevent excess water from diluting your marinade.
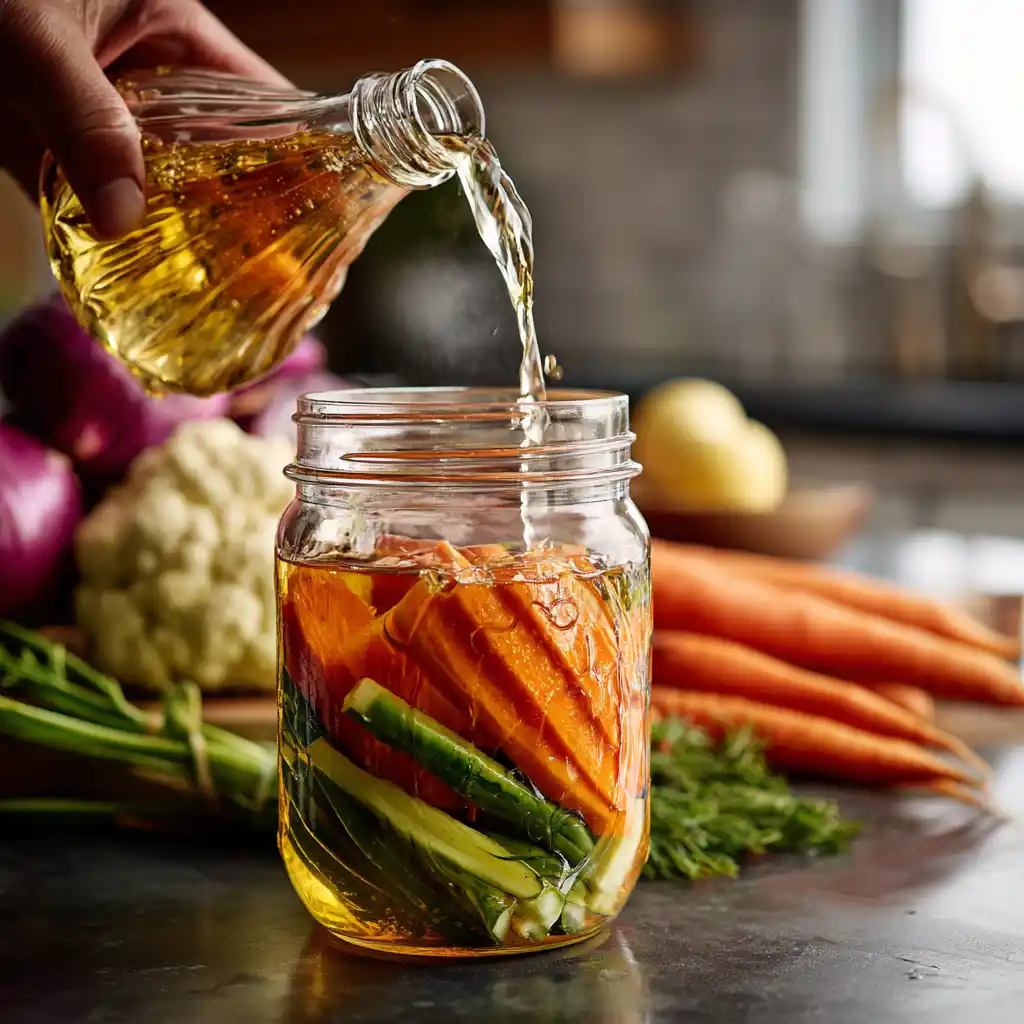
Making the Pickling Brine: Vinegar, Oil, and Spice Balance
Your brine is where the magic happens — it brings life to your chopped veggies.
Classic Brine Base:
- 2 cups white vinegar
- 1 cup water
- 2–3 cloves garlic (minced)
- 1 tablespoon dried oregano
- 1 teaspoon chili flakes
- Optional: mustard seeds or celery seeds
Bring the mixture to a gentle boil, then cool to room temperature before pouring over the veggies.
For Chicago-Style Giardiniera:
Instead of vinegar-only brine, use a 50/50 blend of vinegar and oil (olive oil or soybean oil). Stir in your spices and pour directly over the drained vegetable mix — no boiling required.
Don’t skip this step — a flavorful brine is the backbone of every standout giardiniera recipe.
Final Assembly and Jar Storage
Once your veggies are dry and your brine is ready, it’s time to pack your jars.
Instructions:
- Fill jars with the mixed vegetables, pressing down to minimize air pockets.
- Pour cooled brine or oil mixture over the vegetables until fully submerged.
- Tap jars gently to release bubbles, then seal tightly.
Storage Tips:
- Refrigerate for 48 hours before eating for best flavor.
- Homemade giardiniera lasts up to 4 weeks when refrigerated.
- Shake jars every few days to redistribute flavors evenly.
Check out this cucumber tomato salad for a refreshing way to serve your homemade giardiniera.
Italian Giardiniera vs Chicago-Style Giardiniera
Oil-Packed vs Vinegar-Based: Texture and Taste Differences
When it comes to choosing the right giardiniera recipe for your palate, it all depends on whether you prefer a bright, tangy crunch or a rich, spicy punch. Italian and Chicago-style giardiniera may share core ingredients, but their taste profiles and textures differ dramatically.
Italian Giardiniera
- Vinegar-based brine
- Light, crisp, and refreshing
- Often served as antipasto
- Mild heat or no heat at all
- Typically includes oregano, garlic, and herbs
Chicago-Style Giardiniera
- Oil-packed (olive or soybean oil)
- Softer, slightly richer mouthfeel
- Significantly spicier, thanks to serrano or sport peppers
- Designed for sandwiches, pizza, and meat dishes
- May include olives and celery seeds for complexity
If you’re after a zesty side dish or salad topper, go with the Italian version. But if you want a bold, spicy condiment to jazz up roast beef or grilled sausage, the Chicago style wins hands down.
Heat Level: Spicy Chicago vs Milder Italian
Heat is one of the biggest dividing lines between these two styles. Italian giardiniera is more about preserving flavor than adding fire. You’ll find little to no heat unless chili flakes are added intentionally.
On the flip side, Chicago-style giardiniera isn’t shy — it brings the heat. The oil base amplifies the spice from hot peppers like:
- Serrano
- Jalapeño
- Sport peppers
- Crushed red pepper flakes
You can always tone it down or crank it up depending on your preference. That’s the beauty of any homemade giardiniera recipe — total control over flavor.
Culinary Uses and Cultural Importance
Giardiniera is a kitchen chameleon, fitting into many dishes beyond sandwiches. But regional traditions define how it’s typically served.
Italian Usage:
- Served alongside cheeses and cured meats
- Added to cold salads or pasta dishes
- A tart counterbalance to rich main courses
Chicago Usage:
- Essential on Italian beef sandwiches
- Scooped onto pizza and hot dogs
- Mixed into grain bowls, scrambled eggs, or tacos
Chicagoans take their giardiniera recipe seriously — it’s part of the city’s identity, right up there with deep-dish pizza and Vienna beef.
Don’t miss our healthy dinner ideas to pair with spicy or mild giardiniera for a balanced, flavorful meal.
Serving Suggestions – How to Use Giardiniera Recipe in Everyday Meals
Giardiniera Recipe Sandwich Toppings You’ll Crave
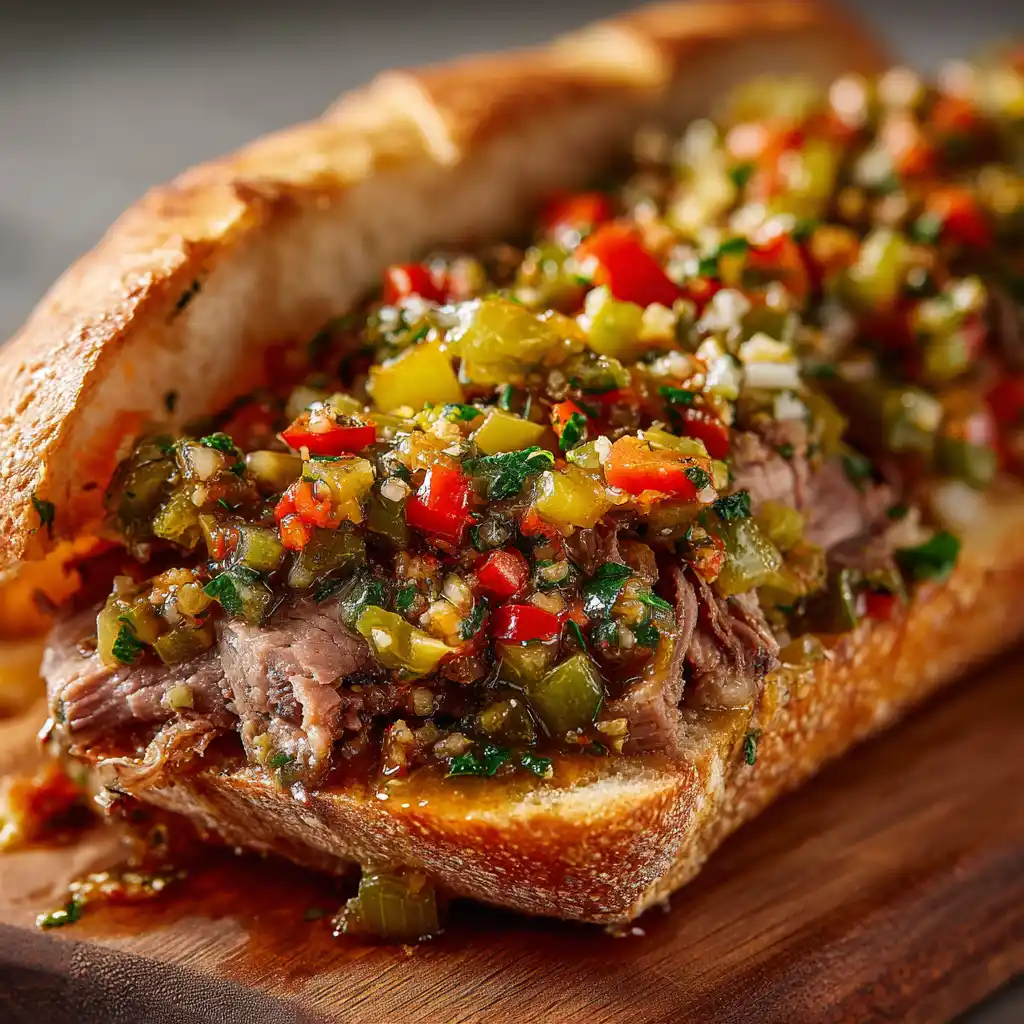
One of the most popular ways to use a giardiniera recipe is as a sandwich topping. Whether it’s a hot Italian beef sandwich or a cool deli sub, this spicy, crunchy mix adds the perfect punch.
Layer your homemade giardiniera recipe onto:
- Grilled turkey or chicken sandwiches
- Roast beef or pastrami subs
- Veggie wraps with hummus
- Pulled pork sliders
- Breakfast sandwiches with egg and sausage
This is where the oil-packed version of the giardiniera recipe really shines — it blends beautifully with meats and melty cheese.
Pizza and Antipasto Platters with Giardiniera Recipe
Add spoonfuls of your giardiniera recipe over pizza just before baking for an incredible tangy kick. The heat from the oven slightly softens the vegetables while maintaining their crunch, and the spice seeps into the cheese for unforgettable flavor.
Chicago-style pizzas especially benefit from this topping — but don’t stop there. Your giardiniera recipe is a great fit for:
- Flatbreads with ricotta and spinach
- Homemade Margherita pizzas
- Grilled naan with mozzarella
It also belongs on any antipasto board. Spoon your giardiniera recipe beside olives, salami, roasted red peppers, and aged cheese. You’ll instantly upgrade your appetizers.
Giardiniera Recipe in Pasta, Rice, and Grain Bowls
The best thing about a giardiniera recipe is its versatility. From cold pasta salads to warm grain bowls, it’s a simple way to inject flavor and texture.
Stir it into:
- Quinoa bowls with roasted vegetables
- Couscous with feta and lemon
- Wild rice and chicken bowls
- Orzo pasta salads with cherry tomatoes and spinach
Just 2–3 tablespoons of your homemade giardiniera recipe can brighten the entire dish without the need for extra dressing.
Add Your Giardiniera Recipe to Fresh Salads
A bold salad deserves bold toppings. Skip store-bought croutons or heavy sauces and use your giardiniera recipe as a flavorful, low-calorie alternative.
Use it in:
- Italian chopped salads
- Kale and chickpea bowls
- Romaine and grilled shrimp salads
- Lentil and goat cheese salads
Don’t miss our stuffed peppers without rice, a recipe that pairs perfectly with a spoonful of spicy giardiniera recipe on top.
Creative Ways to Use Giardiniera Recipe You Haven’t Tried Yet
Your giardiniera recipe doesn’t have to stay in the condiment category. Try these easy ideas for working it into everyday meals and snacks:
- With eggs: Add it to scrambled eggs, omelets, or frittatas
- On avocado toast: Spicy crunch meets creamy richness
- In tacos: Combine with pulled chicken or black beans
- On burgers: Top beef or veggie patties for instant kick
- As a snack: Mix with cream cheese on a cracker
With one good giardiniera recipe, your meals instantly become more vibrant, nutritious, and exciting. And since it’s loaded with veggies, you’re boosting flavor and fiber in every bite.
Discover how your giardiniera recipe pairs with creamy mashed cauliflower for a balanced side dish.
Storage Tips and How Long Giardiniera Recipe Lasts
How to Store Your Homemade Giardiniera Recipe Properly
Once you’ve put the effort into making the perfect giardiniera recipe, the next most important step is storing it right. Proper storage ensures food safety, preserves texture, and intensifies flavor over time.
Here’s what you should know:
- Always use clean, sterilized glass jars with airtight lids
- Pack your vegetables tightly to eliminate air pockets
- Ensure the brine or oil fully covers all vegetables in the jar
- Wipe jar rims clean before sealing to prevent spoilage
For oil-packed giardiniera, leave about ½ inch of headspace. This allows the oil to expand slightly in the fridge without leaking.
Refrigerate immediately after packing. Even though vinegar and oil help preserve the mix, refrigeration is key for homemade recipes without added preservatives.
Refrigeration vs Pantry: What’s Safe for a Giardiniera Recipe?
If you’re using a store-bought giardiniera recipe with added preservatives, some jars can be shelf-stable before opening. However, with a homemade giardiniera recipe, refrigeration is non-negotiable unless you’re pressure-canning (which requires separate safety steps).
Best Practices:
| Storage Method | Shelf Life | Notes |
|---|---|---|
| Refrigerator | 3–4 weeks (homemade) | Keep sealed tightly and submerged |
| Pressure-canned | 6–9 months | Requires proper acid and canning temp |
| Pantry (unopened, store-bought) | Check label | Only safe if labeled shelf-stable |
| Freezer | Not recommended | Oil can separate or go rancid |
Don’t risk it — always err on the side of safety when storing your giardiniera recipe. Keep your jars cold, sealed, and clean.
Signs Your Giardiniera Recipe Has Gone Bad
Even with vinegar and oil as natural preservatives, spoilage can still occur — especially if storage steps are skipped. If any of these signs appear, toss the jar immediately:
- Foul or sour smell beyond normal vinegar sharpness
- Visible mold on veggies or inside lid
- Cloudy brine (if not due to added spices like mustard seeds)
- Mushy texture or sliminess
- Bubbling or hissing when opening the jar (could indicate gas buildup)
A properly stored giardiniera recipe should remain crisp, brightly colored, and aromatic.
Can You Freeze Giardiniera? Pros and Cons
Technically, yes — but it’s not recommended. Freezing your giardiniera recipe can cause oil to separate and veggies to soften too much. Vinegar-based pickles fare slightly better, but the crunch is often lost after thawing.
If you must freeze it:
- Use only vinegar-based versions
- Store in airtight, freezer-safe containers
- Thaw in the fridge (never at room temperature)
- Consume within 1 month after freezing
Still, your best bet is to refrigerate a fresh batch and use it within a few weeks. That way, you get the crisp, fresh flavor your giardiniera recipe was meant to deliver.
Nutritional Benefits – Is Giardiniera Recipe Healthy?
Nutrient Breakdown of a Giardiniera Recipe
One of the most appealing things about making your own giardiniera recipe is that it’s naturally packed with vegetables. From cauliflower to carrots, peppers to celery, it delivers fiber, antioxidants, and essential vitamins in every bite — all while adding major flavor to your meals.
Here’s a typical nutritional profile for a ¼ cup serving of oil-based homemade giardiniera:
| Nutrient | Approx. Amount | Benefits |
|---|---|---|
| Calories | 60–90 (depending on oil) | Energy boost with healthy fats |
| Total Fat | 6–9g | Mostly from heart-healthy olive oil |
| Carbohydrates | 2–4g | Mostly fiber from vegetables |
| Fiber | 1–2g | Aids digestion and fullness |
| Sodium | 300–600mg | Preservative; must be moderated |
| Vitamins | A, C, K | Immune and cell support |
When prepared with olive oil and fresh, colorful veggies, a giardiniera recipe becomes more than just a topping — it’s a smart addition to your diet.
Is Giardiniera Recipe Low-Calorie and Keto-Friendly?
Yes — with a few smart tweaks, a homemade giardiniera recipe can easily fit into low-carb, keto, or paleo lifestyles. Most vegetables used (like cauliflower, celery, and bell peppers) are naturally low in carbs. And when packed in olive oil, the fat content supports keto macros.
To keep your version keto-compliant:
- Avoid sweeteners or sugary vinegars
- Use olive oil, avocado oil, or MCT oil
- Add more hot peppers for flavor without carbs
For low-calorie goals, just reduce the oil or use a vinegar-only base.
Don’t miss our healthy dinner ideas to combine with your giardiniera recipe for a balanced, satisfying meal.
Sodium Levels and Heart Health Considerations
Here’s where moderation comes in. Like all pickled foods, a traditional giardiniera recipe contains salt — and salt equals sodium.
The salting step is essential for texture and safety, but excessive sodium intake can raise blood pressure and cause water retention. Here’s how to manage it:
- Rinse your giardiniera lightly before eating
- Use reduced-sodium salt when possible
- Don’t add extra salt to meals that already include giardiniera
- Stick to small servings (2–4 tablespoons per dish)
Homemade versions are ideal because you can fully control the salt levels compared to store-bought jars.
Homemade vs Store-Bought Nutritional Differences
If you compare a store-bought jar to a batch from your own kitchen, the homemade giardiniera recipe nearly always comes out on top nutritionally.
| Factor | Store-Bought | Homemade Giardiniera Recipe |
|---|---|---|
| Sodium | 500–800mg per serving | As low as 200mg (adjustable) |
| Preservatives | Often included | None (fresh and clean) |
| Oil Type | Often soybean or canola | Olive or avocado oil (your choice) |
| Added Sugar | Sometimes | Optional or none |
The takeaway? Making your own giardiniera recipe gives you the power to choose cleaner ingredients and tailor the nutrition to your needs.
Giardiniera Variations and Flavor Experiments
Spicy Jalapeño Giardiniera Recipe for Heat Lovers
If you’re someone who believes food should come with a little fire, turn up the heat in your giardiniera recipe with jalapeños. This variation swaps or adds jalapeños in place of mild peppers like bell or banana.
What to do:
- Use 3–5 fresh jalapeños, sliced thin
- Leave the seeds in for more heat
- Add extra chili flakes or serrano peppers if you like it really spicy
This version pairs beautifully with tacos, grilled chicken, or even breakfast burritos. The jalapeño adds a crisp bite and distinct flavor that chili flakes alone can’t match.
Fermented Giardiniera Recipe for Gut Health
Want to support your digestion while enjoying serious flavor? Try fermenting your giardiniera recipe instead of pickling it with vinegar. Fermentation naturally produces probiotics that support gut health, reduce inflammation, and even improve mood.
How to ferment giardiniera:
- Skip the vinegar and use a saltwater brine (about 3% salt by weight)
- Pack tightly in a jar and use a fermentation weight
- Leave at room temperature for 5–7 days before refrigerating
The flavor becomes tangier, and the texture stays crisp. It’s a fantastic way to make your giardiniera recipe work harder for your health.
Sweet and Mild Giardiniera for Kids and First-Timers
Not everyone loves spice — and that’s okay. If you’re serving a crowd or introducing someone new to giardiniera, a sweet and mild variation is the perfect entry point.
How to make it milder:
- Use red, yellow, or orange bell peppers only
- Add 1 teaspoon of honey or maple syrup to the vinegar
- Avoid hot peppers and chili flakes entirely
This version is excellent on sandwiches, grain bowls, and even as a topping for baked potatoes or scrambled eggs. It still delivers tang and crunch, just without the heat.
Oil-Free or Vegan Giardiniera Recipe Options
Looking to cut back on fats or avoid oil entirely? You can still enjoy all the flavor of a good giardiniera recipe without sacrificing texture.
Oil-free tips:
- Use a vinegar-based brine with added herbs for depth
- Consider adding lemon juice or apple cider vinegar for complexity
- Store in the fridge and consume within 2–3 weeks for best results
This vegan-friendly option is lower in calories, sodium (if adjusted), and works perfectly in meal prep bowls or over roasted vegetables.
Check out our gluten-free dinner ideas to serve alongside oil-free giardiniera for a light, flavorful meal.
Common Mistakes When Making Giardiniera Recipe
Overcrowding the Jar Can Ruin the Texture
One of the most common issues when preparing a giardiniera recipe is packing the jar too tightly. While it might seem efficient, cramming too many veggies into a small jar can:
- Prevent the brine or oil from circulating evenly
- Leave some pieces unpickled and vulnerable to spoilage
- Lead to a soggy, uneven texture
Solution: Use a wide-mouth jar and leave space for the brine to flow. Press the veggies gently but avoid compacting them too much.
Not Using Enough Salt or Vinegar in the Brine
Your giardiniera recipe relies on proper preservation, and that means a strong, balanced brine. Skimping on salt or vinegar can lead to bland flavor and even unsafe storage.
Common mistakes:
- Using table salt instead of kosher or pickling salt
- Diluting vinegar too much with water
- Forgetting to cover all vegetables completely
Fix: Stick to tested ratios — usually about 1 part vinegar to 1 part water, and 1 tablespoon of kosher salt per cup of liquid. And always taste your brine before using it.
Skipping the Resting Time Before Serving
Homemade giardiniera isn’t meant to be eaten right away. Skipping the crucial 48-hour resting period can leave you with underdeveloped flavor — and disappointment.
Letting your giardiniera recipe chill in the fridge for at least two days allows the brine to fully penetrate the vegetables, balancing the salt, acid, and spice.
If you taste it too soon, it might seem overly sharp or flat. Give it time, and the magic happens.
Using the Wrong Oil or Tap Water
When making a Chicago-style giardiniera recipe, choosing the right oil is essential. Low-quality oils can solidify oddly in the fridge or go rancid quickly.
Tips:
- Use extra virgin olive oil, avocado oil, or sunflower oil
- Avoid canola or vegetable oils with additives
- For water, use filtered or distilled to avoid cloudiness or contamination
Tap water may contain chlorine or minerals that can interfere with flavor and shelf life. Always use clean, neutral ingredients for the best results.
Neglecting Jar Sterilization and Clean Handling
You could have the perfect brine, the freshest veggies, and the boldest spice — but if your jars aren’t clean, your giardiniera recipe won’t last.
Mistakes to avoid:
- Using jars straight from the cabinet
- Handling ingredients with dirty hands
- Storing jars that aren’t sealed properly
Quick fix: Boil jars or run them through a hot dishwasher cycle. Always use clean utensils, dry hands, and keep your workspace spotless.
Don’t miss our giardiniera guide for more pro tips on technique and prep.
Frequently Asked Questions About Giardiniera Recipe
What ingredients are in a giardiniera recipe?
What is the difference between Italian and Chicago giardiniera?
What does giardiniera taste like?
Is giardiniera healthy?
Conclusion: Master Your Own Giardiniera Recipe at Home
Whether you’re aiming to spice up your sandwich game, upgrade your antipasto platter, or simply explore a new culinary tradition, mastering a homemade giardiniera recipe is an easy, satisfying way to bring bold, tangy, and customizable flavor to your kitchen.
From the traditional Italian vinegar-based style to the fiery, oil-packed Chicago version, giardiniera fits into almost any meal. And with endless ways to adjust heat, texture, and seasoning, your homemade jar will always reflect your personal taste.
So grab your favorite veggies, pick a brine, and start experimenting. Because once you try a fresh, crunchy giardiniera recipe made with your own hands, you may never go back to store-bought again.
Looking for more delicious and wholesome ideas? Don’t miss our guide on green detox juice to pair with your giardiniera-powered meals.
For more recipe inspiration and visual guides, check out our curated boards on Pinterest.