

If you’re craving perfectly crispy, juicy baked chicken wings without the deep-frying mess, you’re in the right place. This guide covers everything from how long to bake chicken wings to seasoning tricks and oven temperatures that actually work.
My love for cooking started in a sunlit coastal kitchen where rosemary floated through the air and food was more than fuel—it was comfort, tradition, and love. I grew up surrounded by women who believed that a warm meal could speak louder than words. I still remember standing on a stool, helping my aunt with olive bread, feeling proud just to sprinkle herbs.
That curiosity turned into a passion. Today, every dish I share—like these irresistible baked chicken wings—is tied to a memory, a moment, or a shared table. Whether you’re hosting game day or just need an easy dinner, this recipe delivers on both flavor and heart.
Looking for inspiration? Try Boneless Skinless Chicken Thighs in Oven for another easy, flavorful oven-baked option.
Table of Contents
Why Baked Chicken Wings Are Better Than Fried
Health Benefits of Baking Over Frying
Fried wings may get all the hype, but baked chicken wings offer something even better: flavor without the guilt. When you bake instead of fry, you’re cutting out tons of extra oil and calories. That means less saturated fat, fewer greasy fingers, and a much healthier plate.
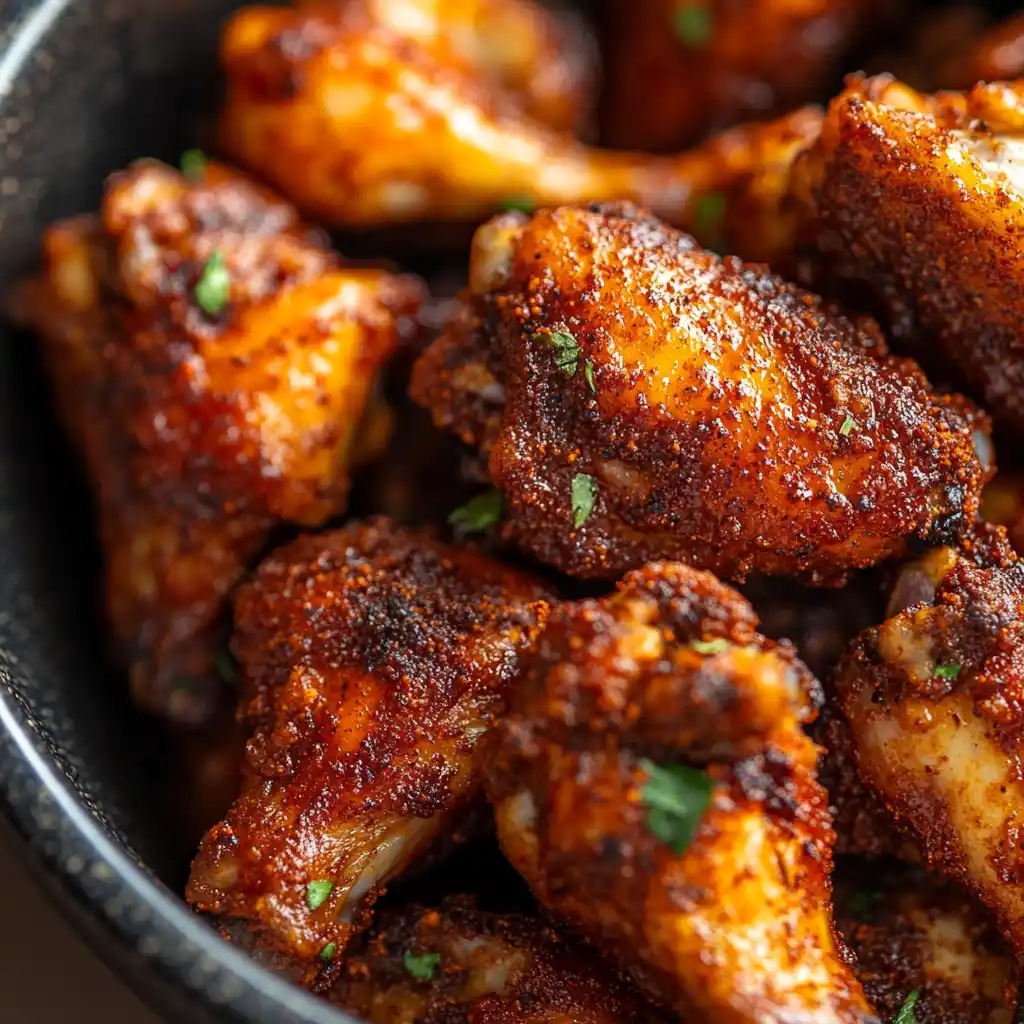
Here’s the bonus: you still get that addictive crispy skin. The key? Baking at high temperatures and using a wire rack for even air circulation.
A quick glance at nutritional differences:
| Method | Calories (per 5 wings) | Fat (g) | Crispiness |
|---|---|---|---|
| Fried | ~500 | 35g | High |
| Baked | ~290 | 18g | High (if done right!) |
Plus, baking is hands-off. No splattering oil or babysitting a skillet. Just pop them in the oven and let the magic happen.
Flavor Differences Between Baked and Fried Wings
Believe it or not, many people actually prefer the taste of oven-baked chicken wings. Why? Because baking allows the natural flavor of the chicken and seasonings to shine through without being overwhelmed by oil. You can play with dry rubs, marinades, and glazes—each one adding its own personality to the dish.
Another perk: baked wings soak up sauces better. Whether it’s classic buffalo or sticky honey garlic, you’ll get that glorious cling and flavor punch in every bite.
Discover great ideas like Boneless Chicken Thigh Recipes for more ways to enjoy juicy, oven-baked chicken at home.
Print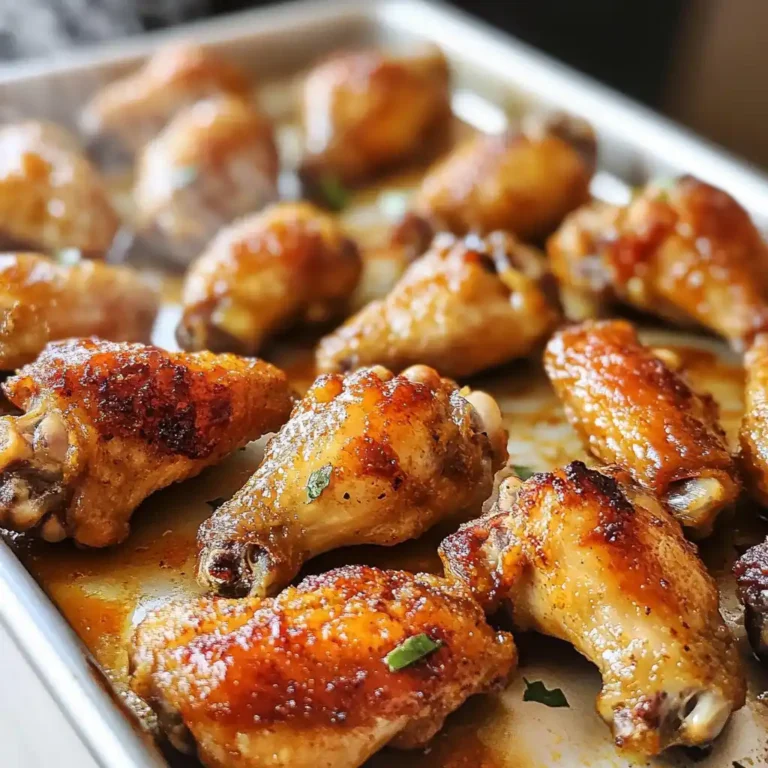
Crispy & Juicy Baked Chicken Wings: The Ultimate How-To Guide
Perfectly crispy and juicy baked chicken wings with golden skin and flavorful seasoning—no frying needed.
- Total Time: 55 minutes
- Yield: 4 servings
Ingredients
- 2 lbs chicken wings
- 1 tbsp baking powder (aluminum-free)
- 1 tsp salt
- ½ tsp black pepper
- 1 tsp garlic powder
- 1 tsp smoked paprika or cayenne (optional)
- 1 tbsp neutral oil (avocado or olive oil, optional)
Instructions
- Preheat oven to 400°F (204°C).
- Pat chicken wings completely dry using paper towels.
- Toss wings in baking powder, salt, pepper, garlic powder, and paprika or cayenne.
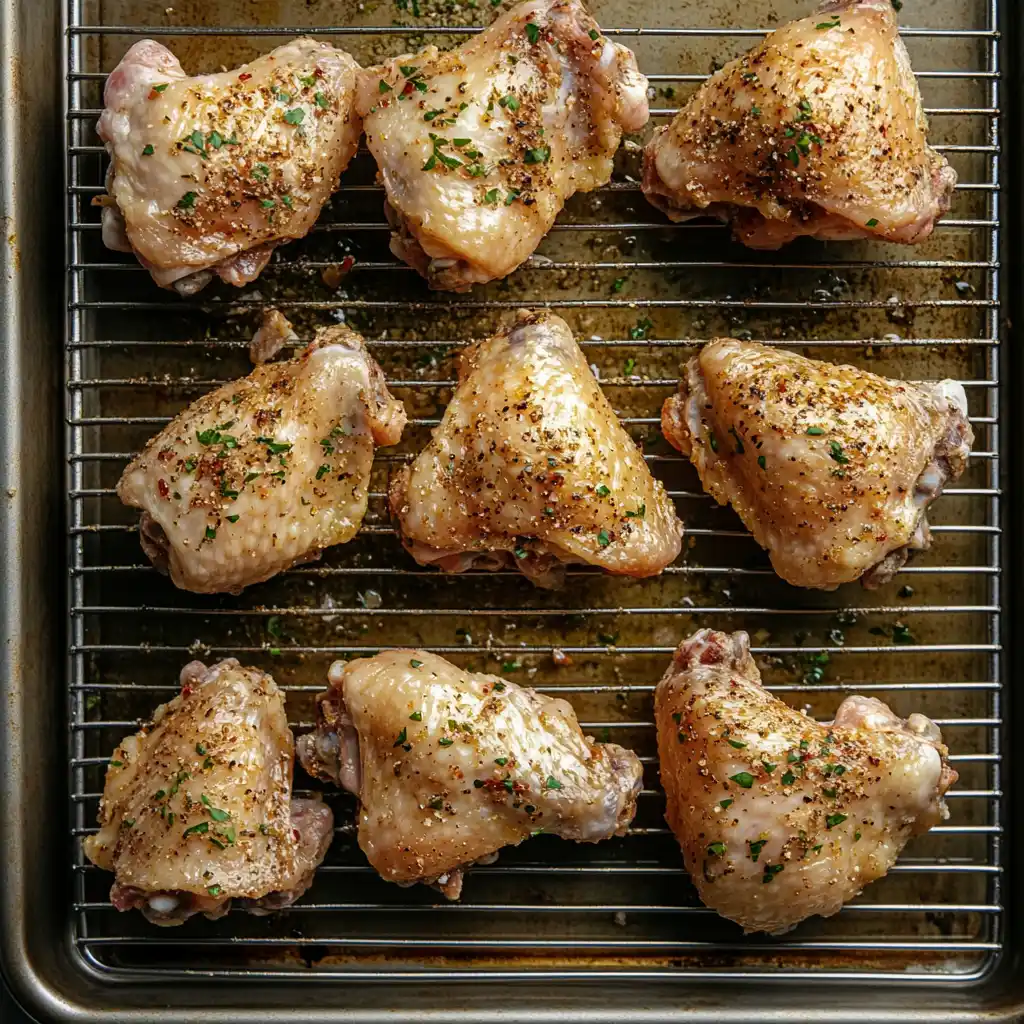
- Place wings on a wire rack over a foil-lined baking sheet.
- Bake for 40–45 minutes, flipping halfway through.
- Ensure internal temperature reaches at least 165°F (74°C).
- Let rest 5 minutes before tossing in sauce or serving dry-rubbed.
Notes
For extra crispiness, bake at 250°F for 30 minutes, then increase to 425°F for 30–40 minutes. Drying wings and using a rack are key for crispy skin.
- Prep Time: 10 minutes
- Cook Time: 45 minutes
- Category: Appetizer
- Method: Oven-Baked
- Cuisine: American
How to Bake Chicken Wings Perfectly Every Time
Essential Ingredients for Baked Chicken Wings
A great batch of baked chicken wings doesn’t need a long list of ingredients—just the right ones. Here’s what you’ll need for a basic version that you can build on with marinades or sauces:
- Chicken wings (whole or separated into flats and drumettes)
- Baking powder (not baking soda—it’s key for crispiness)
- Salt and black pepper
- Garlic powder
- Smoked paprika or cayenne (optional for a bit of heat)
- Neutral oil like avocado or olive oil (optional but helpful for even browning)
Why baking powder? It helps draw out moisture and creates that crisp, golden skin without the need for frying.
Here’s a simple ratio guide:
| Ingredient | Amount (per 2 lbs of wings) |
|---|---|
| Baking Powder | 1 tablespoon |
| Salt | 1 teaspoon |
| Black Pepper | ½ teaspoon |
| Garlic Powder | 1 teaspoon |
| Paprika (optional) | 1 teaspoon |
Check out Chicken Stir Fry if you’re looking for another easy, flavorful chicken dish with bold seasoning.
Step-by-Step Instructions on How to Bake Chicken Wings
Follow these foolproof steps to achieve crispy, golden-brown oven-baked chicken wings every time:
- Preheat your oven to 400°F (204°C).
This is the sweet spot for crisping the skin without drying out the meat. - Pat the wings dry.
Use paper towels to remove as much moisture as possible. Dry skin = crisp skin. - Toss with baking powder and seasonings.
Coat evenly using a large bowl or zip-top bag. Make sure each wing is covered. - Use a wire rack on a baking sheet.
Place the wings skin-side up on a rack over a foil-lined pan. This allows air to circulate underneath for even crisping. - Bake for 40-45 minutes.
Flip halfway through. Wings should be golden and have an internal temperature of 165°F (74°C). - Rest, sauce, and serve.
Let them rest 5 minutes. Toss in your favorite sauce or serve them dry-rubbed for bold flavor.
Pro Tip: For even crispier skin, bake at 250°F for 30 minutes first, then increase to 425°F for another 30-40 minutes. This “low and slow to high and hot” method helps render out more fat.
Don’t miss our Bang Bang Chicken Bowl** for a saucy, spicy twist on baked chicken!
How Long to Bake Chicken Wings at Different Temperatures
How Long to Bake Chicken Wings at 400°F
If you’re wondering how long to bake chicken wings at 400°F, the magic number is usually between 40 to 45 minutes. Baking at this temperature creates the perfect balance between crispy skin and tender meat, making it one of the most reliable temps for home cooks.
When baking baked chicken wings, always remember to:
- Flip halfway through baking (around 20–22 minutes)
- Use a rack on a baking sheet for airflow and even crisping
- Check internal temp—it should hit at least 165°F for safety
Baked chicken wings at 400°F will come out golden, crispy, and full of flavor without needing extra oil or frying.
Tip: Want ultra-crispy wings? Let them rest uncovered in the fridge overnight before baking. This helps dry the skin, which is essential for a crackling finish.
Comparing Bake Times at 375°F, 425°F, and 450°F
Different oven temperatures produce different textures, so knowing how long to bake chicken wings in the oven—depending on the temp—makes all the difference. Here’s a helpful breakdown:
| Oven Temperature | Bake Time | Result | Great For |
|---|---|---|---|
| 375°F | 50–55 minutes | Soft with light crisp | Sticky glazes or sweet sauces |
| 400°F | 40–45 minutes | Crispy skin, juicy inside | Best all-around baked wings |
| 425°F | 35–40 minutes | Extra crispy, caramelized | Heavier spice rubs or dry heat |
| 450°F | 30–35 minutes | Very crispy, can dry out | Quick batches of smaller wings |
For most cooks, baked chicken wings at 400°F offer the best combo of crispiness and tenderness. But if you’re experimenting, feel free to go higher or lower based on your desired texture.
Don’t miss our Bang Bang Chicken Bowl if you’re in the mood for bold sauces and spicy, baked flavor.
Low and Slow, Then Hot and Fast: The Two-Step Method
If you really want the crispiest oven-baked chicken wings, try this game-changing technique:
- Start at 250°F for 30 minutes — this slowly renders the fat
- Then raise to 425°F for 30-35 minutes — this crisps the skin beautifully
This method works especially well for party-size batches of baked chicken wings, ensuring each piece cooks evenly without drying out. The initial slow bake lets fat melt off, while the final high heat crisps things to perfection.
Check out our Steak Salad Guide for the perfect hearty side to pair with your chicken wings.
Whether you’re hosting a football party, meal-prepping for the week, or feeding the family, knowing how long to bake chicken wings gives you confidence in the kitchen. Mastering this step ensures your baked chicken wings come out crispy, flavorful, and never greasy—every single time.
And don’t forget, the best baked chicken wings start with dry skin, a baking rack, and the right oven temp. It’s all about the method—and now, you’ve got it.
Baked Chicken Wings in the Oven: Tips for Crispy Results
Getting that restaurant-style crispiness at home isn’t magic—it’s just good technique. If your baked chicken wings ever come out soggy or unevenly cooked, don’t worry. A few small changes in prep and method can make a huge difference.
How to Prep the Oven and Wings for Maximum Crisp
Crispy oven-baked chicken wings start with a good prep routine. Before even turning on your oven, do the following:
- Pat Wings Completely Dry
Moisture is the enemy of crispiness. Use paper towels to blot away any excess water from the wings—especially the skin. - Use Baking Powder (Not Baking Soda)
Toss your wings in a mix of baking powder and seasoning. Baking powder helps break down proteins on the skin, allowing it to brown better.
→ For every 2 lbs of wings, use 1 tablespoon of aluminum-free baking powder. - Let Them Rest Uncovered in the Fridge
After seasoning, place the wings on a wire rack over a sheet pan and refrigerate them overnight (or at least 4 hours). This air-dries the skin and sets you up for the crispiest baked chicken wings. - Use a High Heat Oven
Bake at 400°F to 425°F for optimal results. This allows the skin to render and crisp while keeping the inside juicy.
Looking for oven-ready chicken ideas? Discover great ideas like Boneless Chicken Thigh Recipes for more healthy and crispy meals.
Best Pans and Racks to Use for Baked Wings
Choosing the right setup matters almost as much as the recipe. Here’s how to bake chicken wings in the oven like a pro:
- Wire Rack Over Sheet Pan
This setup elevates the wings, allowing hot air to circulate and fat to drip down. No soggy bottoms! - Aluminum Foil Lining
Line your pan with foil under the rack for easy cleanup. You’ll thank yourself later. - Use a Convection Oven (if you have one)
Convection ovens circulate hot air, which speeds up the crisping process. Lower your cooking time by 5–7 minutes if using this setting. - Don’t Overcrowd the Pan
Make sure there’s space between each wing. Overcrowding leads to steam, not crisp.
| Tool | Why It Matters |
|---|---|
| Wire Rack | Even heat circulation = even crisping |
| Foil Lined Pan | Easy cleanup, no burning sauces |
| Sheet Pan Size | A larger pan prevents crowding |
| Tongs | Flip wings easily without losing skin |
Don’t miss our Chicken Stir Fry if you’re exploring flavorful ways to use chicken beyond the oven.
Bonus Tip: Let Them Rest Before Serving
Once your baked chicken wings are golden and crispy, pull them out of the oven and let them rest for 5–7 minutes before serving or tossing in sauce. This helps the juices settle and keeps the skin from going soggy too quickly.
Check out our Boneless Skinless Chicken Thighs in Oven for another crispy oven method using dark meat.
With the right prep, gear, and patience, your oven-baked chicken wings will come out crispy, juicy, and flavor-packed every single time—without a drop of deep-frying oil in sight.
Delicious Baked Chicken Wing Marinades and Seasonings
No matter how crispy your baked chicken wings turn out, flavor is what makes people come back for seconds. Whether you like bold spices or something sweet and sticky, the right marinade or dry rub can completely transform your wings.
Let’s break down the best ways to season oven-baked chicken wings so every bite is unforgettable.
Top Dry Rubs for Flavorful Wings
Dry rubs are perfect for baked wings because they form a crust that locks in juices and creates a burst of flavor with every bite. Here are three of the most popular dry rub combos:
1. Classic Smoky BBQ Rub
- 1 tbsp smoked paprika
- 1 tsp garlic powder
- 1 tsp onion powder
- 1 tsp brown sugar
- ½ tsp cumin
- 1 tsp salt
- ½ tsp pepper
2. Cajun-Style Heat
- 1 tbsp Cajun seasoning
- ½ tsp cayenne
- 1 tsp paprika
- ½ tsp dried thyme
- Salt to taste
3. Garlic Parm Perfection
- 2 tsp garlic powder
- 1 tsp Italian seasoning
- 1 tbsp grated Parmesan
- Salt and cracked black pepper
Tip: Pat your baked chicken wings dry before tossing in the dry rub. Let them sit for 15–20 minutes to absorb the flavors before baking.
Looking for bold combinations? Don’t miss our Bang Bang Chicken Bowl—it’s saucy, spicy, and packed with flavor.
Marinade Ideas for Sweet, Spicy, and Savory Wings
If you’re going for juicy, glazed, or sticky oven-baked chicken wings, marinades are the way to go. Marinate for at least 2 hours or overnight in the fridge for deep flavor penetration.
Here are three go-to marinade profiles:
1. Sweet Honey Garlic
- ¼ cup honey
- 3 cloves garlic (minced)
- 2 tbsp soy sauce
- 1 tbsp apple cider vinegar
- 1 tsp olive oil
2. Spicy Sriracha Lime
- 2 tbsp sriracha
- Juice of 1 lime
- 1 tbsp honey
- 1 tbsp soy sauce
- 1 tsp sesame oil
3. Asian-Inspired Teriyaki
- ¼ cup teriyaki sauce
- 1 tbsp brown sugar
- 1 tbsp rice vinegar
- 1 tsp grated ginger
- 1 tsp garlic powder
| Flavor Profile | Best For | Bake Temp |
|---|---|---|
| Sweet & Sticky | Game-day wings or kids’ meals | 375°F – 400°F |
| Bold & Spicy | Crowd-pleasers, party platters | 400°F – 425°F |
| Umami/Savory | Asian-inspired dinners or fusion meals | 400°F |
Discover great ideas like Boneless Chicken Thigh Recipes to use the same marinades on dark meat cuts.
Quick Tips for Maximum Flavor
- Marinate in zip-top bags: This ensures even coverage and easy cleanup.
- Dry rub before baking, glaze after: If using both, apply the rub first and the sauce in the final 10 minutes of baking.
- Save extra marinade: Simmer it on the stovetop to use as a glaze or dipping sauce—just be sure to bring it to a boil first for safety.
Check out our Chicken Stir Fry if you love sweet-savory sauces and quick-cooking meals.
Flavor is the soul of great wings. With the right seasonings or marinades, your baked chicken wings go from good to unforgettable—whether you’re baking for two or serving up a party platter.
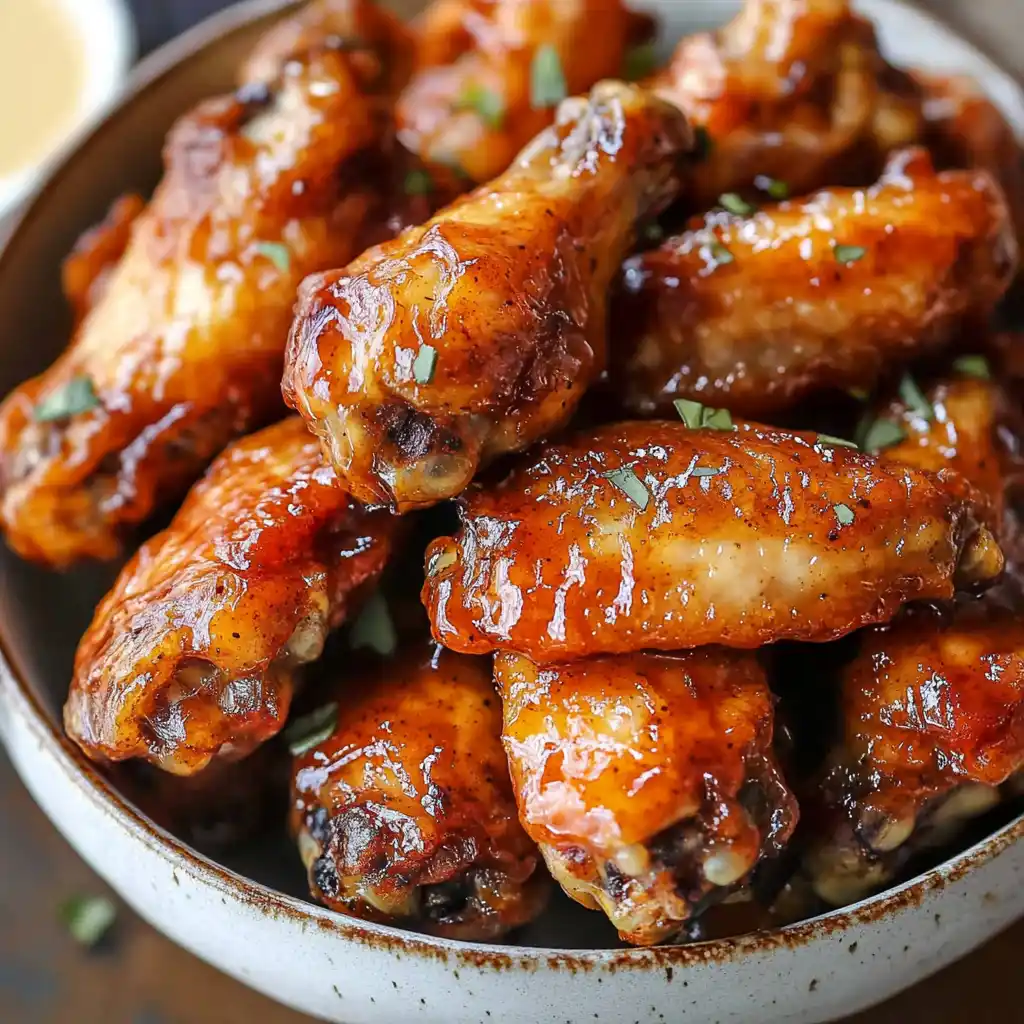
Easy Sauces to Pair with Baked Chicken Wings
You’ve mastered the crisp. Now it’s time to sauce those baked chicken wings like a pro. Whether you crave tangy heat, sticky sweetness, or something bold and savory, the right sauce can take your wings from good to unforgettable.
The beauty of oven-baked chicken wings is that they hold sauces really well—especially with a crispy skin that clings to flavor without turning soggy.
Homemade Buffalo, BBQ, Garlic Parm, and More
Here are five go-to homemade sauces to toss your baked chicken wings in:
1. Classic Buffalo Sauce (Hot & Tangy)
- ½ cup hot sauce (like Frank’s RedHot)
- ¼ cup unsalted butter
- 1 tsp garlic powder
- Optional: Dash of Worcestershire or cayenne
Melt butter and stir in hot sauce. Toss with wings immediately after baking while they’re still hot.
2. Sticky Honey BBQ (Sweet & Smoky)
- ½ cup BBQ sauce
- 2 tbsp honey
- 1 tbsp apple cider vinegar
- Optional: Pinch of smoked paprika
Simmer for 5 minutes and pour over freshly baked chicken wings or use as a glaze for the last 5 minutes in the oven.
3. Garlic Parmesan (Creamy & Savory)
- 2 tbsp melted butter
- 1 tbsp olive oil
- 2 cloves garlic (minced)
- ¼ cup grated Parmesan
- 1 tbsp chopped parsley
Mix and toss over wings fresh from the oven. Finish with extra cheese and a sprinkle of sea salt.
4. Teriyaki Ginger (Sweet & Umami)
- ¼ cup soy sauce
- 2 tbsp brown sugar
- 1 tbsp rice vinegar
- 1 tsp fresh ginger
- 1 clove garlic
Simmer to thicken and glaze over hot wings, or serve as a dipping sauce.
5. Lemon Pepper Butter (Zesty & Light)
- ¼ cup butter
- 1 tbsp lemon juice
- 1 tsp lemon zest
- 1 tsp cracked black pepper
- Salt to taste
This sauce is a fan favorite for lighter, citrus-forward baked wings.
Discover great ideas like Boneless Skinless Chicken Thighs in Oven to use the same sauces on different cuts of meat.
Dipping Sauce Recipes to Complement the Wings
Let’s not forget the dips. While your baked chicken wings are flavorful on their own, the right dip brings the whole plate together.
Here are a few wing-friendly favorites:
| Dip Name | Flavor Profile | Best Wing Pairing |
|---|---|---|
| Ranch Dressing | Cool, creamy | Buffalo, Cajun |
| Blue Cheese Sauce | Tangy, bold | Hot wings, spicy rubs |
| Honey Mustard | Sweet, sharp | BBQ, lemon pepper |
| Garlic Aioli | Rich, savory | Parmesan, rosemary rub |
| Sweet Chili Dip | Spicy, sweet | Teriyaki, Asian-style |
Don’t miss our Steak Salad Guide if you’re looking for a fresh and savory dish to balance saucy wings.
Sauce Application Tips
- Toss wings while hot: Sauce sticks best to freshly baked chicken wings.
- Use just enough: Don’t drown the wings—lightly coat and serve extra on the side.
- Glaze in oven: Want that sticky, caramelized texture? Brush sauce on in the last 5–7 minutes of baking.
Looking for more flavor tricks? Check out our Grilled Mahi Mahi Guide for sauce ideas that work great on fish and chicken alike.
Whether you go bold with Buffalo or rich with garlic parm, a great sauce transforms your baked chicken wings into a standout dish. Feel free to get creative—mix and match, layer sauces, or keep it simple and let the crispy wings shine.
Common Mistakes to Avoid When Baking Chicken Wings
Even the best intentions can lead to rubbery skin, bland bites, or undercooked meat if you’re not careful. But don’t worry—most mistakes with baked chicken wings are easy to fix once you know what to look for.
Let’s go over the most common slip-ups and how to guarantee your wings come out perfectly every time.
Why Your Wings Might Not Turn Out Crispy
One of the biggest goals with oven-baked chicken wings is achieving that crisp, golden skin. If your wings are turning out pale or soggy, here’s what might be going wrong:
1. Not Drying the Wings First
Moisture is the number one enemy of crispiness. Always pat your wings completely dry with paper towels before seasoning. Even a little leftover water can ruin the texture.
2. Skipping the Wire Rack
Placing baked chicken wings directly on a pan traps steam underneath, softening the skin. A wire rack lets hot air circulate all around the wing, giving you that much-needed crunch.
3. Using Too Low of a Temperature
Baking at 350°F or below may leave you with cooked chicken, but the skin won’t crisp. Stick to 400°F–425°F for that classic texture. Some cooks even go up to 450°F for smaller wings.
4. Overcrowding the Pan
When wings are packed together, they steam instead of bake. Spread them out with at least ½ inch of space between each one.
Check out our Boneless Chicken Thigh Recipes to learn more about spacing and roasting techniques for juicy meats.
Mistakes That Can Dry Out the Meat
Crispy is great—but dry and chewy? Not so much. If your baked chicken wings are losing their juiciness, here’s why:
1. Overbaking
It’s tempting to keep them in longer to get more crisp, but overcooking will dry them out fast. Use a meat thermometer and pull the wings when they reach 165°F–170°F internal temp.
2. No Oil or Fat Used
While it’s totally fine to bake without oil, adding a light coat of olive or avocado oil can help seal in moisture and promote even browning.
3. Skipping the Resting Time
Once they’re out of the oven, give your baked wings 5–7 minutes to rest. This keeps juices from escaping when you bite in and helps sauces stick better too.
Looking for other juicy oven methods? Don’t miss our Chicken Stir Fry for fast, flavorful cooking with moisture locked in.
Final Pro Tips for Foolproof Baked Chicken Wings
- Use baking powder, not baking soda — It crisps the skin without affecting flavor.
- Salt in stages — A little before baking and a touch after can balance flavor beautifully.
- Don’t sauce too early — Wait until the last few minutes or toss after baking to avoid sogginess.
Don’t miss our Boneless Skinless Chicken Thighs in Oven for another easy, crispy oven favorite.
By avoiding these simple mistakes, your baked chicken wings will come out just right—crispy, juicy, and loaded with flavor. Consistency is all about understanding what affects texture, moisture, and heat.
Serving Suggestions and Side Dishes
Once you’ve pulled those baked chicken wings out of the oven, crispy and coated in flavor, the next question is: what do you serve with them? Whether you’re planning a party, weeknight dinner, or game-day spread, choosing the right side dishes and pairings can take your meal from casual to unforgettable.
Best Sides to Serve with Baked Chicken Wings
No plate of oven-baked chicken wings is complete without a great side or two. Here are go-to favorites that balance out flavor and texture:
1. Crispy Baked Fries or Sweet Potato Wedges
Classic, filling, and always a crowd-pleaser. Toss in olive oil, garlic, and herbs to match the flavors in your wings.
2. Celery and Carrot Sticks with Ranch or Blue Cheese
This combo isn’t just tradition—it also balances the heat and saltiness of bold wing sauces.
3. Macaroni and Cheese
Creamy, cheesy pasta pairs perfectly with crispy, spicy baked chicken wings—especially for family meals or comfort food nights.
4. Coleslaw or Tangy Cabbage Salad
A crunchy, slightly acidic slaw cuts through rich sauces like BBQ or honey garlic, refreshing the palate with each bite.
5. Cornbread Muffins or Garlic Bread
These sides soak up leftover sauce and bring a warm, buttery contrast to crispy wings.
| Side Dish | Flavor Profile | Complements Sauce Type |
|---|---|---|
| Sweet Potato Wedges | Savory & sweet | Buffalo, Garlic Parmesan |
| Mac and Cheese | Creamy & rich | Cajun, Spicy Dry Rubs |
| Coleslaw | Tangy & crisp | BBQ, Honey Mustard |
| Cornbread | Buttery & sweet | Spicy or smoky wings |
Looking for lighter mains or sides? Check out our Steak Salad Guide for a refreshing protein-packed dish that pairs beautifully with saucy wings.
Creative Ideas for Game Day and Family Dinners
Serving baked chicken wings for a crowd? Here are some fun, flavorful setups that go beyond just piling wings on a plate.
1. Wing Bar Night
Create a DIY wing station with multiple sauces (Buffalo, BBQ, Garlic Parm), dips, and dry rubs. Serve alongside sliders, fries, and finger-friendly veggies.
2. Sheet Pan Wing Platter
Bake multiple types of wings (dry-rubbed, sticky, spicy) on one large tray. Add roasted potatoes, bell peppers, and corn for a one-pan feast.
3. Game Day Grazing Table
Pair baked chicken wings with jalapeño poppers, soft pretzels, spinach dip, and mini tacos. Add a few ice-cold drinks, and you’re set for kickoff.
4. Wings & Waffles Brunch
Serve oven-baked chicken wings on top of mini waffles with maple butter or spicy syrup. It’s savory, sweet, and totally unexpected.
Discover great ideas like Grilled Mahi Mahi Guide if you’re planning a diverse menu for family dinners or special events.
Bonus Tip: Presentation Matters
Even casual wings feel elevated with a thoughtful setup:
- Use butcher paper for rustic trays
- Garnish with parsley or sliced green onions
- Serve dips in small ramekins or mason jars
- Offer wet wipes or lemon-scented napkins (people will thank you!)
No matter how you serve them, baked chicken wings are the kind of food that invites people in—whether it’s a busy Tuesday night or a backyard cookout.
Reheating, Storing & Freezing Baked Chicken Wings
One of the best things about baked chicken wings is how well they hold up as leftovers—if you store and reheat them properly. Whether you’re meal prepping or saving extras from game day, knowing how to store and reheat your wings makes sure they stay just as crispy and delicious the next time around.
How to Store Baked Wings Properly
Let’s start with the basics: how to store oven-baked chicken wings without losing texture or flavor.
In the Refrigerator:
- Let wings cool completely before storing. Warm wings trap steam and get soggy.
- Use an airtight container or wrap tightly in foil.
- Add a paper towel underneath to absorb moisture if possible.
- Store for up to 4 days in the refrigerator.
In the Freezer:
- Place cooled baked chicken wings in a single layer on a baking sheet lined with parchment paper.
- Freeze until solid (about 2 hours), then transfer to a freezer-safe bag or container.
- Label with the date and use within 3 months for best quality.
Tip: Freeze wings without sauce for the best texture when reheating. You can always toss them in fresh sauce later.
Looking for prep-ahead meals? Don’t miss our Boneless Chicken Thigh Recipes for freezer-friendly chicken ideas.
Best Ways to Reheat Without Losing Crispiness
Want your leftover baked wings to be just as crispy as day one? Skip the microwave. Here are the best reheating methods:
1. In the Oven (Best Overall)
- Preheat to 375°F.
- Place wings on a wire rack over a baking sheet.
- Reheat for 10–15 minutes, flipping halfway.
- Finish with a quick broil (2–3 mins) for extra crisp.
2. In the Air Fryer (Quickest Method)
- Preheat air fryer to 350°F.
- Cook for 5–8 minutes, shaking or flipping once.
- Works best for small batches.
3. In a Skillet
- Heat 1 tsp of oil in a nonstick skillet over medium heat.
- Add wings and cook, turning every 2 minutes for even crisp.
- Cover for 1–2 minutes to heat the center if wings are thick.
| Method | Crisp Factor | Time | Notes |
|---|---|---|---|
| Oven | High | 15–20 mins | Best for large batches |
| Air Fryer | High | 5–8 mins | Fast, great for 1–2 servings |
| Skillet | Medium | 8–10 mins | Needs attention, adds flavor boost |
| Microwave | Low | 2–3 mins | Softens skin, last resort only |
Check out our Chicken Stir Fry for reheating-friendly meals that still taste fresh on day two.
Can You Freeze Baked Chicken Wings?
Absolutely. Baked chicken wings freeze well if you follow the proper steps. Just remember:
- Always let them cool first
- Store them sauceless for best results
- Reheat from frozen in the oven at 400°F for 25–30 minutes
Bonus: Make a double batch and freeze half. That way, you’ve always got wings ready for a quick lunch, movie night, or surprise guests.
Discover great ideas like Boneless Skinless Chicken Thighs in Oven to cook once and enjoy multiple meals later.
Final Tip: Re-Sauce After Reheating
Even the best sauces can lose their kick during storage. When reheating baked wings, save some fresh sauce on the side for a quick toss or dip before serving.
With the right methods, your baked chicken wings will stay flavorful, crispy, and satisfying—even the next day.
FAQs About Baked Chicken Wings
How long to bake chicken wings?
How to bake chicken wings?
How long to bake chicken wings at 400?
How to bake chicken wings in the oven?
How long do you bake chicken wings?
What’s the best temperature to bake chicken wings?
Conclusion: Mastering Baked Chicken Wings at Home
From choosing the right temperature to selecting the perfect sauce, you now have everything you need to make baked chicken wings that are crispy, juicy, and loaded with flavor. Whether you’re hosting game night, feeding your family, or prepping for the week, this versatile dish delivers every time.
The best part? You don’t need a deep fryer—just your oven, a few pantry staples, and a little technique. With the tips in this guide, your wings will come out golden and delicious, batch after batch.
Looking for inspiration? Try our Boneless Skinless Chicken Thighs in Oven for more easy, oven-baked chicken recipes that hit the spot.
For more recipe inspiration and visual guides, check out our curated boards on Pinterest.